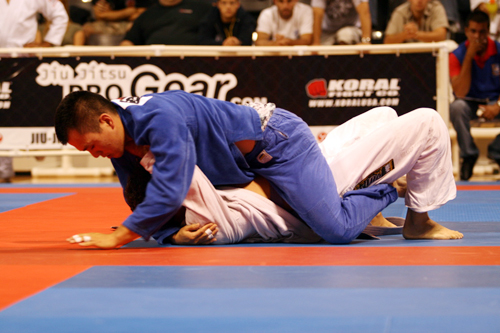
Mount is achieved when you pass your knees above your opponent's hips.
First and foremost... If you are mounted, you messed up very seriously previously to getting to this position. You must attempt to avoid getting in to this spot with strong escapes and movements in one of the inferior top positions previous. But... I well know, that is MUCH easier said than done.
Secondly, when you train and drill this position, realize what a powerful position it is. Getting out is very very difficult. If you do escape, you are likely to be in a bad position afterwards, just not as bad as you were before.
Because you are in such a bad position, realize that you are going to get mauled before anything positive happens. Most of the escape positions involve you moving your arms away from defending against punches and chokes. Know that if you are in a situation where you can be hit, you WILL be hit, likely several times, before you complete the escape.
Beginning the Escape - Theroy
When mounted you MUST defend first with your grappling. You have to make your opponent adjust their position according to your movements. This means disrupting their balance with hip pops and movement.
You MUST avoid allowing your opponent get his knees in to your armpits. If that occurs, you are in very deep trouble, as he has taken away your ability to use your most powerful muscles and your center of gravity to disrupt his balance.
If they DO get their knees in to your armpits, you must attempt to move them back down on to your waist, BEFORE you can begin your escape movements. Otherwise they will be too high on you body to catch their legs.
It is here where you will be at your most vulnerable. Your elbows will be exposed. You need to uncover you face and neck to get your elbows in the best position to move your body up/move their body down. It is at this time where you will get your nose broken, or you will get choked out. Beware, and try to time your movement to minimize the amount of damage you will take.
Best Time to Start is Before They are Finished
The BEST time to begin your escapes is just before your opponent finishes moving to mount, before they can solidify their position. This takes timing and experience. You have to know when to stop defending the mount and start escaping it. I would rather give up position escaping a position early than start escaping a position too late.
Escape Number 1 - Hold and Roll
This is one of the easiest and most intuitive of the mount escapes. Essentially your isolate an arm, block the same side leg and roll. However, there are subtleties to the escape that you must be aware of.
Angle

When you begin your roll, you must BRIDGE!! Not straight up, but at a 45 degree angle. I turn my head until I am looking at the mat. I then take the roll to my inside shoulder. NEVER just roll linearly. Your opponent will base with the arm you have not isolated, and shut your movement down.
Leg Placement
One of the most difficult aspects of this escape is the leg placement in the roll. Your inside leg threads UNDERNEATH your outside leg. This sets your hips and your center of gravity in to a position to complete the escape. It makes it very difficult for your opponent to stop your movement. The natural movement is to step over with your outside leg. This movement is slower and much less powerful than the leg thread movement.
If all goes well you end up in your opponent's guard. This is known as the Rickson Gracie mount escape. No one better to demonstrate it than the man himself:
Escape Number 2 - Knee Elbow Escape
The Knee Elbow Escape involves a very special shrimp movement. To execute this correctly, you must first "umpa" to knock your opponent off balance, then you have to shrimp, while keeping as much as your back on the ground as possible. Expose too much of your back, and your opponent snaps in to an "S" mount and your goose is well and truly cooked.
The movement begins with putting the shrimping leg on the ground. Your same side elbow then is placed on the closest knee of your opponent.
You then start an oblique crunch to push your opponent's leg backwards, while you simultaneously push your hips upwards. As this happens, you stick your shrimping leg knee in to the space between your opponent's instep and shin. Your goal is to bring your elbow to your knee. This places your opponents's knee in between your legs, giving you the half guard position.
Leg Placement
Many of these movements must be executed simultaneously, or in such close proximity for them to be essentially the same movement. This is true with the umpa and the shrimp movement. Leg placement is difficult for the student at first, because the two movements have the direct opposite leg placements.
The umpa requires that both feet be on the ground. The hips are then raised explosively upward. Once the maximum height has been achieved, the leg that you will be shrimping into needs to be set flat on the ground. This is to pre-position it to move the knee in to the space between your opponent's instep and shin at the ankle joint.
So, the idea is to explode upward, then fall back to the mat while extending one leg. The other leg remains in the umpa/shrimp base position.
The knee of the straighted leg then begins to move upward. What is important is that the knee remain flat on the ground. It is imperative to the escape that your knee fit in to this area and pass all the way in. The knee moves forward until it meets the escapee's same side elbow.
Body Position
One of the big dangers with this position is your opponent moving to "S" mount.

Another big danger is that as you place your elbow on his knee you expose your face to punching. To counter both of these, you are going to do an oblique crunch.
How do to an oblique crunch? Try this. Lay on your back with both feet on the ground, knees in the air. While keeping your back on the floor, thread your left hand through your left leg and touch your right ankle. Do the same for the other side. This is an oblique crunch, and a fun exercise you can do for warm ups.
You have your elbow down at your side, your hands high to protect your neck and your face. You execute your umpa that knocks your opponent off balance. As you flatten out your leg and begin to move your knee upwards, you begin your oblique crunch that places your same side elbow on your opponent's knee. You then begin pushing your opponent's knee backwards in to your upward moving leg.
This pincer movement forces your opponent's leg between your own, and you close for half guard.
Ritchie Yip has an excellent video on how to execute this movement.
Half Guard
When I teach this escape, I like to continue on to the Half Guard part of it. It is necessary to think of the half guard escape as part of the mount escape as a whole, because, without teaching and training the movements as a whole, students tend to make it to half guard and stop. This allows their opponent to begin their own half guard escapes. By teaching everything in the same movement, a more complete escape can be envisioned where the escapee ends up in a superior position.After completing the knee elbow escape, it is important to immediately switch your hips outward, and search for the underhook with the elbow push arm. More often than not, you will end up in a very low half guard. The two escape strategy that I use here is first the foot grab escape, followed by the roll under escape. Stephan Kesting, as always shows these two movements with excellent detail.
Put It All Together
How do black belts escape the mount? They chain their movements together. When I roll 99% of the time I use the above two movements to escape the mount. I normally start with the roll escape then, if I'm stopped, I immediately move in to the knee elbow escape. The two complement each other very well. The important point is that I never stop moving. I'm always trying to disrupt my opponent's balance so that they cannot begin their submission movements. They are always dealing with my movements, trying to grapple me. If they miss or if they pause, I have them, and I escape.
It is important to note that you mustn't spaz out. Your movements to disrupt must have purpose. If you are simply flopping around like a dying fish, you cannot take advantage of your opponent's mistakes, and execute your escapes.
No comments:
Post a Comment